Heavy Equipment Bucket Teeth: Maintenance, Replacement & Cost-Saving Guide
Learn when to replace bucket teeth on excavators and loaders, how worn teeth cost you money, and maintenance tips to extend tooth life by 30-50%.
Key Takeaways
- Worn bucket teeth increase fuel consumption by 15-25% and dramatically reduce digging efficiency
- Replace teeth when they lose 40% of their original length — waiting longer damages the adapter and bucket lip
- Most operators run teeth 2-3x longer than they should, costing more in fuel and productivity than replacement teeth would
- Rotating teeth every 50-100 hours can extend total tooth life by 30-50%
- The right tooth style for your soil type matters more than the brand you choose
Bucket teeth are the most frequently replaced wear part on any excavator or loader — and somehow, they’re also the most neglected. Most operators treat teeth as an afterthought, running them until they’re rounded stubs before swapping in new ones. That approach feels like saving money. It’s actually one of the most expensive habits in heavy equipment operation.
Here’s the reality: your bucket teeth are the primary contact point between your machine and the ground. Everything your excavator does — trenching, grading, loading, breaking — starts with those teeth. When they’re sharp and properly matched to your material, your machine works efficiently. When they’re worn, your engine works harder, your fuel bill climbs, and your production drops.
Let’s break down everything you need to know about bucket teeth maintenance, replacement timing, and how to stop leaving money in the dirt.
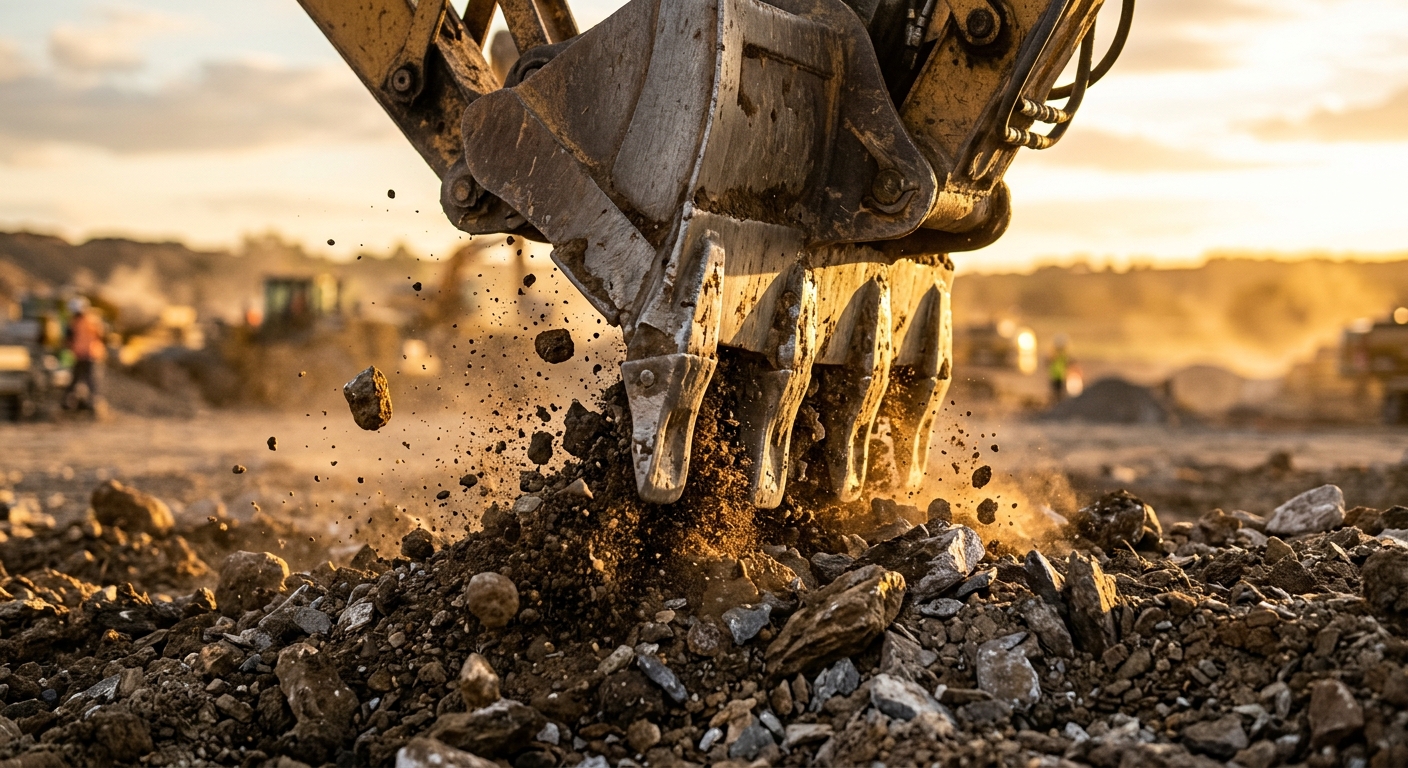
Why Bucket Teeth Matter More Than You Think
Bucket teeth serve three critical functions that most operators only think about when something goes wrong:
1. Penetration efficiency. Sharp teeth cut into material with minimal hydraulic force. The pointed geometry concentrates the bucket’s breakout force into a small contact area, letting the machine dig with less effort. As teeth wear and flatten, that force spreads across a wider surface — and your hydraulic system has to work exponentially harder.
2. Bucket lip protection. Teeth are sacrificial wear parts designed to take the abuse so your bucket doesn’t. The lip, adapters, and bucket structure cost 10-50x more to repair or replace than a set of teeth. Running worn teeth exposes these expensive components to direct ground contact and accelerated wear.
3. Material flow. Properly shaped teeth guide material into the bucket efficiently. Worn, rounded teeth push material aside instead of scooping it, reducing your bucket fill factor and requiring more passes to move the same volume.
The Hidden Cost of “Just a Little More”
Every hour you run past the optimal replacement point, you’re paying a premium in fuel, cycle time, and wear on components that cost 10x more than teeth. A $200 set of teeth can prevent $2,000+ in bucket lip and adapter damage.
How Worn Teeth Cost You Real Money
The numbers on worn bucket teeth are hard to ignore once you see them.
Here’s a practical example. Say you’re running a 20-ton excavator trenching in mixed clay and rock. With fresh teeth, you’re completing 15 cycles per hour with clean bucket fills. As teeth wear down to 50% of their original length, you’re looking at:
- 12 cycles per hour instead of 15 (20% productivity loss)
- 0.8 gallons more fuel per hour due to increased hydraulic demand
- Increased stress on pins, bushings, and cylinder seals from the added force required
Over a 40-hour work week, that’s 32 gallons of extra fuel ($100+), 120 fewer cycles (roughly 8 fewer truckloads), and accelerated wear on components throughout the front-end linkage.
The teeth that would fix all of this? Usually $150-400 for a full set on a mid-size excavator.
When to Replace Bucket Teeth
Timing your tooth replacement correctly is the single biggest lever you have for controlling wear costs. Here’s how to judge it:
The 40% Rule
Replace teeth when they’ve lost approximately 40% of their original length. At this point, they’ve lost most of their penetration advantage but haven’t yet exposed the adapter to significant wear. Going beyond this point delivers rapidly diminishing returns.
Visual Inspection Markers
Run through these checks at the start of every shift:
- Profile shape. New teeth have a pointed, chisel-like profile. If the tip is rounded or mushroomed, replacement is overdue.
- Adapter exposure. If you can see wear marks on the adapter nose (the part the tooth slides onto), the tooth has been run too long.
- Side wear. Check the sides of each tooth for uneven wear patterns. If one side is significantly more worn, the tooth may be loose or the wrong style for your application.
- Cracks. Any visible cracks mean immediate replacement. A cracked tooth can break off in the trench — creating a foreign object that damages conveyors, crushers, or other downstream equipment.
- Length comparison. Keep one new tooth in your toolbox as a reference. Quick visual comparison tells you exactly where you stand.
Pro Tip: Mark Your Teeth
Use a paint pen or welder to mark a line at the 40% wear point on new teeth before installing them. When the ground wears down to your mark, you know it’s time — no guessing required.
Hours-Based Guidelines
Tooth life varies enormously based on soil conditions, but here are rough benchmarks:
| Material Type | Expected Tooth Life | Replacement Interval |
|---|---|---|
| Topsoil / Sand | 400-600 hours | Every 2-3 months |
| Clay / Mixed soil | 200-400 hours | Every 1-2 months |
| Compacted gravel | 100-200 hours | Every 2-6 weeks |
| Rock / Frost | 50-150 hours | Every 1-4 weeks |
| Demolition / Concrete | 30-80 hours | Weekly or more |
Types of Bucket Teeth and Their Applications
Using the wrong tooth style for your material is like using a Phillips screwdriver on a flathead screw — it technically works, but poorly.
General Purpose (GP) Teeth
- Shape: Medium taper, moderate point
- Best for: Mixed soil, clay, general excavation
- When to use: Your default choice for 80% of applications
Heavy Duty (HD) Teeth
- Shape: Wider, thicker profile with reinforced tip
- Best for: Rocky soil, demolition, high-impact applications
- When to use: When GP teeth are wearing out in under 100 hours
Penetration (Tiger / Sharp) Teeth
- Shape: Long, narrow, aggressive taper
- Best for: Hard-packed clay, frost, tight trenching
- When to use: When you need maximum penetration with minimum force
Rock Chisel Teeth
- Shape: Wide, flat chisel profile
- Best for: Solid rock, ripping, prying
- When to use: Dedicated rock excavation work
Flared / Wide Teeth
- Shape: Wider than standard with a flared tip
- Best for: Finish grading, ditch cleaning, loose material
- When to use: When a clean bucket profile matters more than penetration
Match Teeth to Conditions, Not Machines
A common mistake is buying teeth based on the excavator model alone. The soil conditions at your jobsite matter far more. Running penetration teeth in soft sand wastes their advantage. Running GP teeth in rock burns through them unnecessarily fast.
Bucket Tooth Systems Explained
Bucket teeth attach to the bucket lip via adapters, and the retention system holds them in place. Understanding the system matters because it affects replacement time, cost, and parts availability.
Pin-Style Retention
Pros:
- Simple, proven design
- Inexpensive replacement parts
- Field-serviceable with basic tools
Cons:
- Pins can seize in dirty conditions
- Slower to change than modern systems
- Rubber retainers degrade over time
Hammerless (Snap-On) Retention
Pros:
- 2-minute tooth changes with no tools
- Secure lock with visual wear indicator
- Dramatically reduces downtime
Cons:
- Higher per-tooth cost
- Proprietary systems limit parts sources
- Lock mechanisms can clog with fine material
For high-production operations changing teeth frequently, hammerless systems pay for themselves quickly. For machines that change teeth monthly or less, pin-style systems work fine.
Maintenance Tips to Extend Tooth Life
You can’t stop teeth from wearing, but you can slow it down significantly.
1. Rotate Teeth Every 50-100 Hours
Bucket teeth don’t wear evenly. Corner teeth typically wear faster than center teeth due to different ground contact angles. Rotating teeth from center to corner positions (and vice versa) every 50-100 hours evens out the wear and can extend total set life by 30-50%.
2. Keep Adapters in Good Condition
Worn adapters cause teeth to fit loosely, which leads to rocking motion during digging. That rocking accelerates wear on both the tooth and adapter, and can cause teeth to crack or break prematurely. Replace adapters when they show visible wear on the nose.
3. Check Retention Pins Daily
Loose pins let teeth shift during operation. That shifting creates wear patterns that shorten tooth life and can lead to lost teeth — which means stopping work to search for a tooth buried in your spoil pile.
4. Match Digging Technique to Conditions
- In rock: Use shorter, more controlled bucket curls rather than aggressive full-depth passes
- In clay: Let the tooth do the cutting — don’t force the bucket sideways
- In mixed material: Adjust crowd pressure based on what the teeth are hitting
5. Clean Teeth and Adapters During Changes
When swapping teeth, clean all dirt and debris from the adapter nose and tooth bore. Contamination between surfaces accelerates wear and prevents proper seating.
Real-World Example: Rotation Saves 40% on Tooth Costs
A utility contractor running three mid-size excavators implemented a simple tooth rotation schedule — moving corner teeth to center and center to corner every two weeks. Over six months, their tooth consumption dropped from 18 sets to 11 sets across all three machines. At $280 per set, that’s $1,960 saved with zero additional effort beyond the rotation.
How to Change Bucket Teeth
For pin-style systems, here’s the process:
- Position the bucket flat on the ground with the teeth accessible
- Remove the retaining pin — use a hammer and punch to drive it out. Penetrating oil helps if it’s seized
- Slide the old tooth off the adapter nose. It may require a pry bar if it’s been on for a long time
- Inspect the adapter for cracks, excessive wear, or mushrooming. Replace if needed
- Clean the adapter nose — remove all dirt, rust, and debris
- Slide the new tooth on until it seats fully against the adapter shoulder
- Install the retaining pin — make sure it locks securely
- Verify fit — the tooth should not rock or shift when you push on it
Time per tooth: 3-5 minutes for experienced operators, 8-10 minutes if pins are seized.
Safety Warning
Never work under a raised bucket to change teeth. Always lower the bucket flat to the ground and shut down the machine. Bucket teeth weigh 5-25 lbs each — a falling tooth from a raised bucket can cause serious injury.
Cost Breakdown: Teeth vs. Lost Productivity
Let’s put hard numbers on the “run them longer to save money” approach vs. timely replacement.
The math is straightforward: Running one extra month on worn teeth to “save” $300 on a tooth set can easily cost $1,500+ in extra fuel, lost productivity, and accelerated adapter wear. Over a year, that decision repeated monthly turns a $3,600 teeth budget into $18,000+ in hidden costs.
The cheapest set of teeth you’ll ever buy is the one you install on time.
Common Mistakes Operators Make
Running Mismatched Teeth
Mixing different tooth styles or brands on the same bucket creates uneven digging forces. The bucket tends to drift sideways, wearing teeth unevenly and increasing stress on the bucket structure.
Ignoring Corner Teeth
Corner teeth often wear 30-50% faster than center teeth because they contact material at an angle during bucket curl. If you’re only checking center teeth, you’re missing the first ones that need attention.
Using the Bucket as a Pry Bar
We’ve all seen it — using the bucket to pry out rocks, stumps, or concrete. This puts extreme lateral force on teeth and adapters they weren’t designed for. It bends adapters, cracks teeth, and can damage the bucket lip.
Skipping Adapter Inspection
Changing teeth without checking adapters is like putting new brake pads on warped rotors. The new teeth will wear faster and fit poorly, costing you more in the long run.
Buying the Cheapest Teeth Available
Bargain teeth made with lower-grade steel can wear 2-3x faster than quality teeth. Price per tooth means nothing — price per hour of tooth life is what matters. A $30 tooth that lasts 100 hours costs more per hour than a $50 tooth that lasts 250 hours.
Track Tooth Wear with FieldFix
Keeping track of tooth replacement intervals across multiple machines and varying soil conditions is exactly the kind of thing that falls through the cracks on busy jobsites. That’s where systematic tracking pays off.
Stop Guessing on Tooth Replacement Timing
FieldFix lets you log tooth changes, track wear intervals by machine and soil type, and get alerts when teeth are approaching replacement based on your actual operating hours — not generic guidelines.
- 📊 Log replacement dates and hours for every tooth change
- 🔔 Automatic reminders based on your historical wear patterns
- 📸 Photo documentation to track wear progression over time
- 💰 Cost tracking to see your true cost-per-hour for wear parts
The Bottom Line
Bucket teeth are cheap. Everything they protect is expensive. The operators and fleet managers who understand this spend less on maintenance overall because they’re replacing $200 tooth sets on schedule instead of $15,000 bucket lips when things get out of hand.
Build a simple system: inspect daily, rotate regularly, replace at 40% wear, and track your intervals. Your fuel bill will drop, your production will stay consistent, and your buckets will last years longer than they would otherwise.
It’s not glamorous maintenance. But dollar for dollar, staying on top of your bucket teeth is one of the highest-ROI habits in heavy equipment operation.
Related Articles
May 1, 2026
Heavy Equipment Transmission Maintenance: The Complete Guide to Preventing Drivetrain Failure
April 30, 2026
Heavy Equipment Cooling Pack Cleaning Guide: Stop Overheating Before It Starts
April 29, 2026