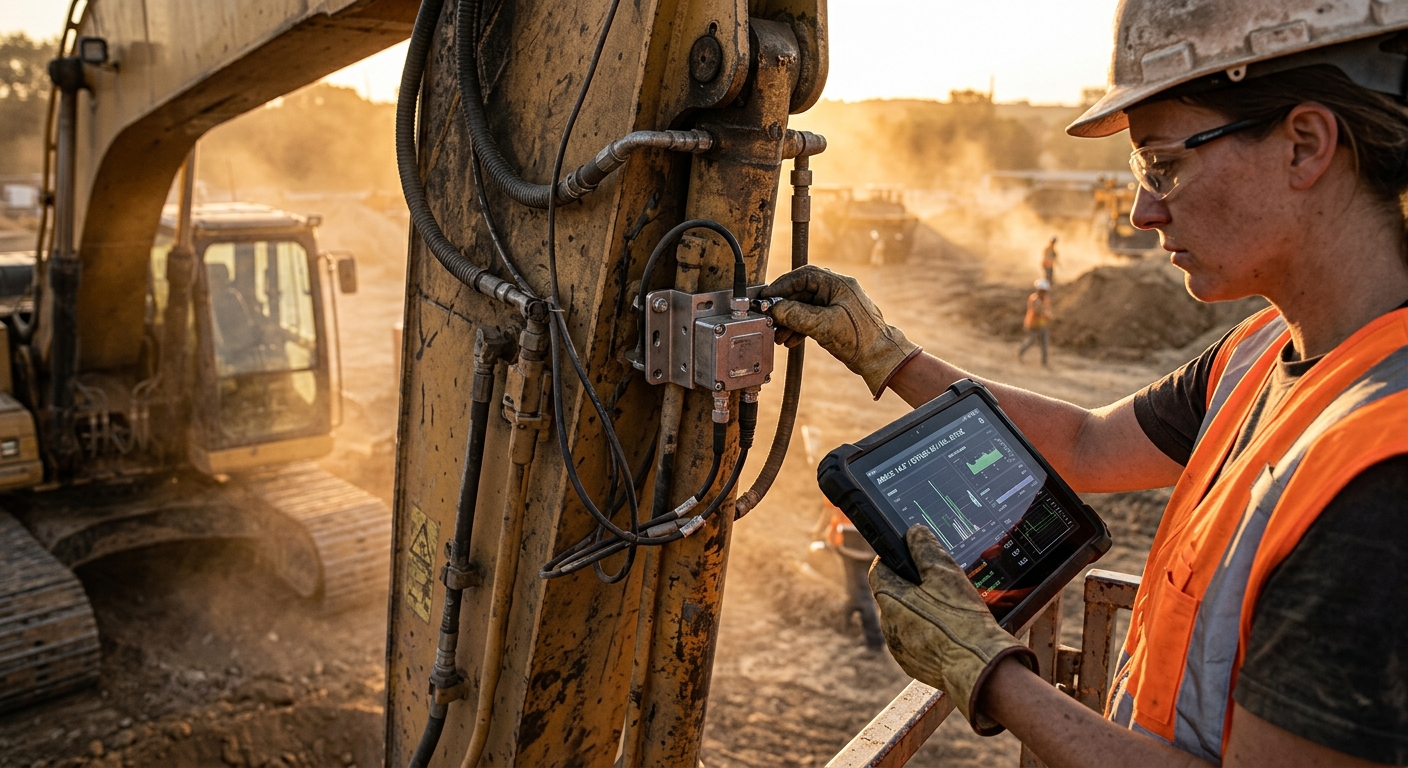
Heavy Equipment Sensor Calibration Guide: Prevent False Readings and Costly Rework
Learn how to calibrate heavy equipment sensors, prevent false readings, reduce rework, and keep grade, load, tilt, and pressure systems accurate.
Key Takeaways
- Sensor drift creates expensive problems long before a machine throws a fault code
- Grade, payload, tilt, pressure, and temperature sensors all need routine validation, not blind trust
- A 20-minute calibration check can prevent hours of rework, callback labor, and unsafe operation
- Bad wiring, dirty connectors, bent brackets, and poor zeroing cause more false readings than failed parts
- Logging calibration events in FieldFix helps crews spot repeat failures and prove maintenance was done
Modern heavy equipment runs on sensors whether operators realize it or not. Grade systems depend on angle sensors and GNSS inputs. Payload systems depend on pressure transducers and position references. Safety functions rely on tilt sensors, limit switches, and outriggers reporting the truth. Even the simple dashboard warning your operator ignores is usually being triggered by a sensor signal upstream.
That is the problem: crews often trust the screen more than the machine. If the monitor says a boom is level, they assume it is. If the payload display says the truck is full, they send it. If a pressure reading looks normal, they move on. But sensors drift. Mounting brackets get bumped. Connectors corrode. Wiring rubs through. Software updates reset values. Suddenly the machine is not broken in an obvious way, but it is lying to you.
This guide covers how to think about calibration like a maintenance discipline instead of a one-time setup step.
Why Sensor Calibration Matters
Calibration is not just about getting pretty numbers on a screen. It is about keeping machine decisions tied to reality.
If your grade control is off by an inch, the problem is not an inch. The problem is overcut, extra stone, extra fill, extra labor, and the headache of explaining why the finished work is wrong. If your payload system is off by 8%, you are either underloading trucks and losing production or overloading them and creating liability. If a boom lift tilt sensor is inaccurate, that moves from a maintenance issue to a safety issue fast.
Calibration is not a substitute for diagnosis. If a sensor is reporting garbage because of damaged wiring, water intrusion, or a bent bracket, repeatedly calibrating it will not fix the root cause. It just wastes time and creates false confidence.
The fleets that stay sharp treat calibration like torque checks or fluid sampling: routine, documented, and worth doing before the machine embarrasses them in the field.
Which Sensors Need Attention
Not every machine has the same electronics package, but these are the usual trouble spots:
- Angle and tilt sensors on booms, sticks, buckets, lift arms, and aerial platforms
- Pressure transducers on hydraulic circuits, load sense lines, and payload systems
- Position sensors tied to grade control, joystick references, or cylinder travel
- Temperature sensors that drive cooling logic, warnings, or derates
- Speed and rotational sensors on driveline, fan, or attachment systems
- Limit switches and proximity sensors used for safety interlocks and travel restrictions
Sensors That Commonly Drift
More likely to drift or need validation:
- Angle sensors mounted on exposed structures
- Payload and hydraulic pressure sensors after hose, valve, or cylinder work
- Tilt sensors after transport incidents, rough handling, or structural repairs
- Position sensors after software updates, controller replacement, or battery disconnect events
Less likely to drift but still worth checking:
- Stable factory-mounted temperature sensors
- Shielded speed sensors with no recent repair history
- Simple proximity switches in protected areas
- Sealed sensors with clean connectors and no impact history
The point is not to become paranoid. The point is to know where bad data usually starts.
Common Causes of Bad Readings
Most people jump straight to “bad sensor.” That is lazy maintenance. Plenty of inaccurate signals come from everything around the sensor.
Think in layers: sensor, mount, connector, harness, controller, software value, and real-world reference. If you skip layers, you skip the actual cause.
Here are the usual offenders:
1. Impacted or shifted mounts
A machine gets hauled, a bucket gets swapped, or a boom takes a hard hit. The sensor still works, but its physical reference changed. Now the value is consistently wrong.
2. Corrosion and moisture
Low-voltage circuits do not tolerate corrosion well. A little green fuzz inside a connector can create unstable readings that come and go with vibration.
3. Poor ground or supply voltage
Sensors need clean reference voltage. Weak batteries, charging problems, or damaged grounds can distort multiple inputs at once.
4. Repairs that changed system geometry
Cylinder replacement, line boring, welding, or structural repair can alter the relationship between the sensor and the component it is measuring.
5. Software resets or controller replacement
Install a new monitor or controller and suddenly the machine forgot its baseline values. The sensor may be fine; the calibration data is not.
Real-World Example
An excavator crew complained that grade control was “jumping around” after a stick cylinder repair. The sensor was replaced twice with no improvement. The real issue was a slightly twisted mounting tab and a harness rubbed thin against the boom. One bracket correction and harness repair later, the readings stabilized and the replacement sensors looked pretty innocent.
When to Calibrate
Calibration should happen on purpose, not just when the machine is acting weird.
Build it into your process after:
- Sensor replacement
- Controller, display, or software updates
- Hydraulic cylinder replacement or major adjustment
- Structural welding or line boring near a measured component
- Attachment changes when geometry affects the system
- Any incident involving impact, rollover risk, or harsh transport
Also schedule validation checks when:
- Operators report inconsistent readings
- Grade or payload numbers do not match real-world results
- Alarms trigger intermittently with no clear mechanical failure
- A machine has recurring “fixed” electrical complaints
Best practice: validate first, calibrate second. If the reading is unstable, jumping, or obviously irrational, inspect the circuit and hardware before opening the calibration menu.
A Practical Calibration Workflow
You do not need a fancy shop process to be disciplined here. You need consistency.
-
Confirm the complaint Compare what the display says to a trusted physical reference. Use a level, tape, pressure gauge, scale, or known machine position.
-
Inspect the hardware Check brackets, fasteners, sensor bodies, connector locks, harness routing, and signs of impact or rub-through.
-
Verify electrical basics Confirm power, ground, and reference voltage. Look for corrosion, moisture, or spread terminals.
-
Fix obvious physical problems first Tighten, clean, repair, or reposition before touching software.
-
Perform zeroing or calibration per system procedure Follow the machine workflow carefully. Many systems require specific boom positions, unloaded conditions, or warm hydraulic oil.
-
Validate again in the real world Do not stop because the screen says “calibration complete.” Check that the result makes sense in actual operation.
-
Document what changed Record the complaint, what was corrected, what values were reset, and who verified accuracy.
Do not calibrate around worn parts. If pins, bushings, wear pads, bent structures, or loose mounting hardware allow movement, your calibration may be accurate only while the machine is sitting still. Once it loads up, the readings drift again.
Machine-Specific Examples
Different machines fail differently. Here is where calibration discipline pays off.
Excavators and Grade Systems
Watch boom, stick, and bucket angle references after cylinder work, attachment changes, or sensor bracket contact. If the finished trench depth is inconsistent, verify the machine against a known benchmark before blaming the operator.
Wheel Loaders and Payload Systems
Payload accuracy depends on hydraulic pressure inputs, lift path consistency, and clean zero points. Calibrate after hydraulic repairs, scale complaints, or repeated underload and overload tickets.
Aerial Lifts and Tilt/Interlock Systems
If the platform disables unexpectedly or tilt alarms act up on level ground, inspect the sensor mount and chassis attitude first. A false-safe shutdown is frustrating. A false-clear reading is worse.
Cranes and Rated Capacity Aids
Load-related sensors need disciplined verification after rigging incidents, repairs, or transport shocks. A calibration shortcut on lift-critical equipment is not brave. It is stupid.
Repair First or Calibrate First
This is where technicians either save time or waste an entire afternoon.
If the problem is a steady but wrong reading, calibration may be appropriate after inspection. If the problem is an erratic, dropping, spiking, or intermittent reading, suspect wiring, connectors, grounding, or mounting integrity first.
Use this rule of thumb:
- Stable error usually points to setup, zero point, or mechanical reference shift
- Unstable error usually points to electrical noise, poor connection, moisture, or failing hardware
That simple distinction keeps you from recalibrating a broken signal path ten times and calling it troubleshooting.
Documentation and Accountability
Calibration work disappears fast if you do not document it. Then the same machine comes back three weeks later, nobody remembers what was done, and the crew starts over.
Track:
- Date and machine hours
- Sensor or system involved
- Complaint reported by the operator
- Repairs made before calibration
- Zeroing or calibration steps completed
- Validation method used
- Photos of brackets, connectors, or measurement references
Calibration Mistakes That Waste Time
These are the repeat offenders:
- Calibrating with cold oil when the system expects operating temperature
- Skipping the inspection and assuming the electronics are the whole story
- Using unlevel ground as a zero reference
- Ignoring worn linkage, loose mounts, or bracket damage
- Replacing the sensor before proving power, ground, and signal integrity
- Failing to validate after calibration in a real operating condition
Bad calibration data can look like a successful repair. The warning clears, the monitor stops complaining, and everyone moves on. Then the machine starts producing bad work or nuisance shutdowns again. Clearing the symptom is not the same as restoring accuracy.
How FieldFix Helps
Sensor calibration is exactly the kind of maintenance work that gets lost in texts, memory, and verbal handoffs. FieldFix gives you one place to log the complaint, attach photos, record the corrective action, and track recurring issues by machine.
With a clean maintenance history, you can answer the questions that actually matter:
- Did this reading problem start after a repair?
- Has this sensor failed before, or has the harness failed before?
- Are operators reporting the same issue across one machine or several?
- Did we validate the fix or just close the ticket?
Stop trusting bad data
If your fleet depends on grade systems, payload readouts, safety interlocks, or pressure-based alerts, calibration history should live next to the rest of your maintenance records. FieldFix helps you log inspections, repairs, photos, and recurring sensor issues so your crew fixes the root cause instead of chasing the same false reading twice.
Related Articles
August 23, 2026
Heavy Equipment Grease Gun Maintenance Guide: Clean Tools, Longer Pin Life
August 22, 2026
Portable Pressure Washer Maintenance Guide for Contractors: Pumps, Hoses, Nozzles, and Winter Protection
August 21, 2026