Heavy Equipment Structural Crack Inspection Guide
Learn how to inspect booms, sticks, loader arms, frames, and weld zones for structural cracks before they become costly heavy equipment failures.
Most equipment failures are not dramatic at first. They begin as hairline cracks near a weld, a little rust line bleeding out of a seam, chipped paint around a pin boss, or a small movement that nobody can quite explain. Then the machine stays in service, keeps taking shock loads, and the damage spreads until a simple weld repair turns into a major structural job.
That is why structural crack inspection deserves more respect than it gets. Operators notice leaks, flat tires, and dead batteries quickly because those problems are obvious. Frame fatigue is quieter. It hides in dirty weld zones, under attachments, around boom feet, on loader arms, at articulation points, near outrigger mounts, and around other stressed sections that see constant twisting and impact.
If you run excavators, loaders, skid steers, dozers, telehandlers, cranes, or compact equipment, structural inspection is not optional. Steel can only absorb so many repeated loads before fatigue starts showing itself. Add bad operating habits, overloading, harsh terrain, poor previous repairs, and ignored attachment wear, and you have the recipe for a crack that gets expensive fast.
is usually a repair decision.
becomes a downtime and safety decision.
can turn into frame distortion, attachment misalignment, or catastrophic failure.
Why structural inspections matter
Structural cracks are not just cosmetic defects. They change how the machine carries load. Once steel starts cracking, the force that used to distribute across a broader section begins concentrating at the damaged area. That means every cycle, bump, bucket load, or lift makes the problem worse.
The consequences are bigger than one repair bill. A crack in a loader arm can change bucket geometry. A crack near an excavator boom foot can affect machine control and create dangerous failure risk. A crack in a skid steer frame or attachment plate can damage nearby components and eat tires, tracks, pins, bushings, and hydraulic lines along the way.
There is also the ugly liability side. If a structural failure hurts someone, drops a load, damages property, or causes a road incident during transport, nobody is going to care that the crack looked small three weeks ago. They will care that it was visible and the machine kept working anyway.
Where cracks usually start
Cracks tend to appear in predictable places. The exact location depends on machine type, but the pattern is almost always the same: they show up where stress is highest, where movement repeats constantly, or where a prior repair changed how force travels through the steel.
Pay extra attention to these areas:
Boom, stick, and loader-arm weld zones
Excavators and loaders take repeated shock loading every day. Crack initiation often starts near weld toes, reinforcement plates, cylinder mounts, and transition areas where thick sections meet thinner material.
Pin bosses and pivot points
When pins and bushings wear, movement increases. That extra slop transfers abnormal load into the surrounding structure. Cracks around pin bosses are common when wear gets ignored too long.
Main frames and articulation joints
Wheel loaders, articulated machines, and support equipment can develop cracking around hinge points, frame plates, and torsion-heavy sections. Rough terrain and high-speed travel make this worse.
Attachment interfaces
Quick couplers, coupler ears, mounting plates, and auxiliary attachment brackets see concentrated load changes, especially when operators slam attachments or run oversized tools.
Outrigger, stabilizer, and upper-structure mounts
Cranes, lifts, and other lifting machines often crack near stabilizer structures because those sections see enormous loading and unloading cycles.
- Repeated shock loading or hard impacts
- Loose pins, bushings, or attachment fit
- Overloading and aggressive travel habits
- Poorly executed previous repairs
- Corrosion that thins or pits the steel
- Ignoring small visual changes during washdown or inspection
- Routine inspections with clean weld-zone photos
- Keeping pin and bushing wear under control
- Fixing small cracks before they run
- Matching attachments to machine capacity
- Training operators to avoid violent loading habits
- Tracking repeat failures by asset and location
A previous repair deserves extra scrutiny. Some repairs are excellent. Some are lipstick on a fatigue problem. If a crack was gouged, plated, or rewelded without addressing the underlying cause, the structure often re-cracks beside the repair. That does not mean welding was the problem. It means the root cause never left.
A compact excavator returns from rental with a decent-looking weld repair near the stick cylinder mount. Two months later the same area starts bleeding rust beside the plate edge. The real issue turns out to be worn pins plus frequent side-loading with a thumb attachment. The repair held. The operating condition did not.
What a practical crack inspection looks like
A useful structural inspection is not complicated, but it does require discipline. You are looking for movement, fatigue clues, and early separation before the defect becomes obvious from across the yard.
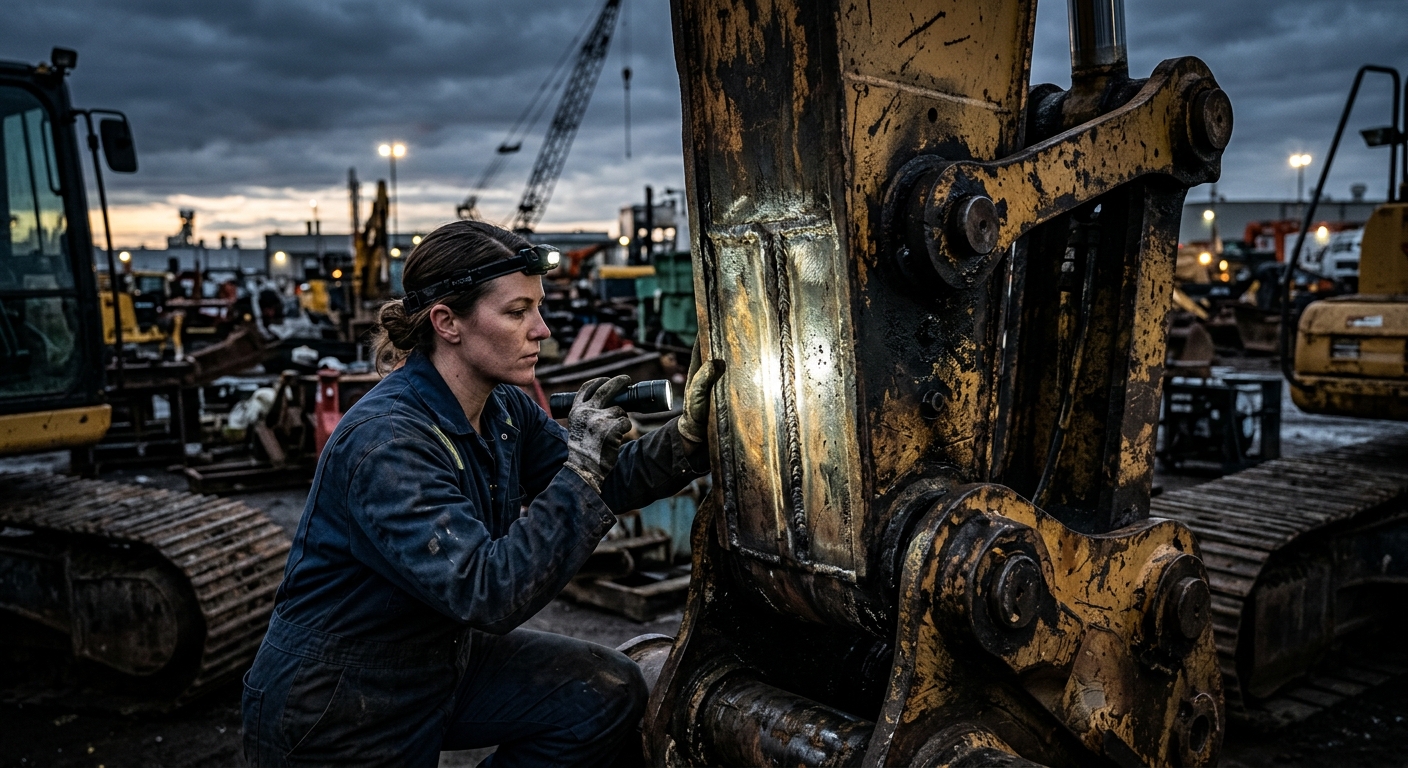
Start with a clean surface. Dirt hides cracks. Grease can hide a fracture line. Wash high-risk areas if needed, then inspect under good light.
Step 1: Look for visual indicators
Focus on:
- Hairline fractures running from weld toes or corners
- Rust trails bleeding from a seam or plate edge
- Paint cracking in a straight or crescent line
- Polished or shiny metal where two surfaces are moving
- Distortion, uneven gaps, or changes in bracket alignment
- Missing weld material or cracking at weld ends
Step 2: Check adjacent wear points
Do not stop at the crack itself. Inspect nearby pins, bushings, mounts, stops, and attachment connection points. Structural damage is often the downstream result of wear elsewhere.
Step 3: Compare both sides
If the machine has left and right mirrored structures, compare them. One side often tells you what “normal” should look like. If one loader arm gusset shows paint failure and the other side does not, that is worth taking seriously.
Step 4: Document with close photos
Take clear photos from the same angle over time. Crack growth is easy to underestimate from memory. Photos make change obvious.
Step 5: Mark and monitor if appropriate
For non-critical, engineer-approved situations, marking crack ends and recording length can help verify whether the damage is stable or spreading. That does not replace judgment. It just gives you evidence.
Some fleets also use dye penetrant or other nondestructive testing methods for suspicious areas or critical lifting structures. That is smart when the machine role justifies it. But most crack prevention still comes down to boring basics: clean it, inspect it, photograph it, and do not talk yourself out of what you can plainly see.
Warning signs operators miss
Operators usually do not say, “I found a structural crack.” They report symptoms.
Listen for phrases like:
- “The attachment feels sloppy”
- “It started making a popping sound”
- “The bucket does not sit right anymore”
- “That side looks lower”
- “It keeps eating pins”
- “There is fresh paint damage around that bracket”
- “I swear that weld did not look like that last week”
These comments matter because structural problems often show up as changes in feel before they show up as obvious separation. Noise under load, unusual flex, recurring loose hardware, or strange attachment alignment can all point back to fatigue.
often means movement where the structure should stay rigid.
can be a symptom, not the root cause.
is a structural warning until proven otherwise.
When to repair now versus park the machine
This is where fleets get themselves in trouble. They confuse “still operational” with “safe to continue.” Those are not the same thing.
If the crack is in a critical structural area, is visibly growing, is associated with distortion, or affects lifting, travel, steering, or attachment retention, the safe answer is usually to park the machine and evaluate it properly. Trying to squeeze out a few more days is how small repairs turn into ugly failures.
Situations that typically justify immediate downtime include:
- Cracks in booms, sticks, loader arms, frames, or articulation joints
- Damage near cylinder mounts or high-load pivot zones
- Any visible spreading at weld ends or through parent metal
- Distortion, twisting, or misalignment around the crack
- Cracks on lifting machines or load-bearing support structures
- Repeat failures in the same spot after prior repair
Less critical cosmetic weld flaws or non-load-bearing bracket issues may allow planned repair instead of immediate shutdown, but that call should still be informed by someone competent, not wishful thinking from the yard.
A wheel loader shows a hairline crack at a frame gusset during a weekly washdown. The machine is still running fine, so the crew wants to finish the week. Good call from the supervisor: it gets parked, inspected, and repaired before the crack reaches the plate edge. Downtime is one planned shop day instead of a mid-job failure plus collateral damage to nearby components.
How to build a fleet routine
A structural inspection program should not live only in the head of one great mechanic. It needs a repeatable process.
Daily operator awareness
Operators should be trained to spot obvious changes during pre-start and shutdown walks:
- New paint cracking around welds
- Fresh rust bleed
- Loose guards or brackets that were solid yesterday
- Unusual noise or movement during operation
- Attachment fit changes
Weekly inspection focus
Maintenance or supervisors should perform a more deliberate walkaround on high-stress areas with a flashlight and clean sight lines.
Triggered inspections
Any machine should get an extra structural check after:
- A hard impact
- Overload event
- Attachment failure
- Rollover or tip incident
- Transport mishap
- Repeated pin, bushing, or mount wear complaints
Repair verification
After a structural repair, inspect the surrounding system too. Confirm pin fit, geometry, attachment match, and operating conditions. Otherwise the repaired area just becomes the place where the next crack starts.
How to track repeat structural issues
Structural problems are exactly the kind of issue fleets forget badly when records are weak. Somebody remembers that “we welded that once,” but nobody remembers when, how large it was, what caused it, or whether the opposite side is now starting to do the same thing.
Track these details every time:
- Machine and hour reading
- Exact crack location
- Photos before and after repair
- Suspected cause
- Repair method used
- Related wear items found nearby
- Whether the same area failed before
That data matters. If one machine keeps cracking around a coupler mount, maybe the attachment mix is wrong. If several similar machines show the same fatigue point, maybe you need a preventive inspection campaign before they all fail the same way.
The smart move is keeping those notes in one system instead of scattered across texts, paper forms, and human memory. Structural damage is too expensive to manage casually.
Final takeaway
Structural crack inspection is one of those maintenance habits that feels slow right up until it saves you from a brutal failure. Clean weld zones, compare both sides, pay attention to rust bleed and paint cracking, inspect the wear points around the damage, and document everything with photos. Then be honest about risk. A machine can still move and still be a bad bet.
Catch the crack while it is still a repair. Do that consistently, and you will save money, reduce downtime, and avoid the kind of failure story nobody wants attached to their fleet.
FieldFix helps operators and mechanics log inspections, attach photos, track recurring structural repairs, and keep machine history organized so small crack issues get handled before they snowball.
Related Articles
September 4, 2026
Heavy Equipment Fall Service Planning Guide: How to Prevent Winter Downtime
September 3, 2026
Horizontal Directional Drill Maintenance: The Complete HDD Service Guide for Contractors
September 2, 2026