Heavy Equipment Wear Plate and Liner Maintenance Guide
Learn how to inspect wear plates and liners on heavy equipment, prevent structural damage, and schedule replacement before abrasion turns into downtime.
Key Takeaways
- Wear plates and liners are sacrificial parts, not lifetime parts
- Thin liner material quietly transfers abrasion into buckets, beds, hoppers, and machine structure
- Replacing a worn liner early is far cheaper than rebuilding the parent component behind it
- Consistent inspections, thickness checks, and operator notes help crews catch wear before cracks start
- FieldFix makes it easier to log wear trends, plan parts orders, and stop repeat failures
Wear plates and liners are some of the least glamorous parts on heavy equipment, which is exactly why they get ignored. Nobody gets excited about a side cutter liner in a bucket, the floor liner in a dump body, or a wear surface inside a hopper. They are not flashy. They do not have sensors. They usually do not trigger warning lights.
They just quietly absorb abuse every day.
That is their whole job. Wear plates and liners exist so expensive parent structures do not take the hit directly. When those sacrificial surfaces wear too thin, the machine keeps working for a while, which fools people into thinking everything is fine. It is not fine. The abrasion simply moves deeper into the machine, where repairs get uglier, downtime gets longer, and the invoice gets mean in a hurry.
If your fleet moves gravel, crushed concrete, riprap, sand, mulch, millings, spoil, demolition debris, or wet sticky material, liner maintenance deserves more attention than it usually gets. This guide covers how to inspect wear plates, what warning signs matter, when repair still makes sense, and how to keep sacrificial parts from turning into structural repairs.
Why wear plates matter more than crews think
Most maintenance conversations focus on engines, hydraulics, tracks, tires, or electrical faults. Fair enough. Those systems can stop production immediately. Wear plate problems are different. They usually build slowly enough that crews normalize them.
The bucket feels a little rougher dumping. The dump body starts hanging material more often. The hopper floor gets a little noisier. Somebody notices a shiny thin area, then gets pulled onto something more urgent.
That delay is where the money gets burned.
Warning: Wear components rarely fail alone. Once a liner wears through, abrasion starts attacking welds, mounting hardware, corners, floor sections, sidewalls, and structural members that were never supposed to be sacrificial.
The real value of wear plates is not that they last forever. It is that they are predictable. If you inspect them consistently, you can usually plan replacements before damage spreads. That makes them one of the more controllable maintenance costs in a fleet.
What wear plates and liners actually do
Wear plates and liners protect machines from abrasion, impact, sliding friction, and concentrated load. Depending on the machine, they may be bolted in, welded in, or built as replaceable sections. Common examples include:
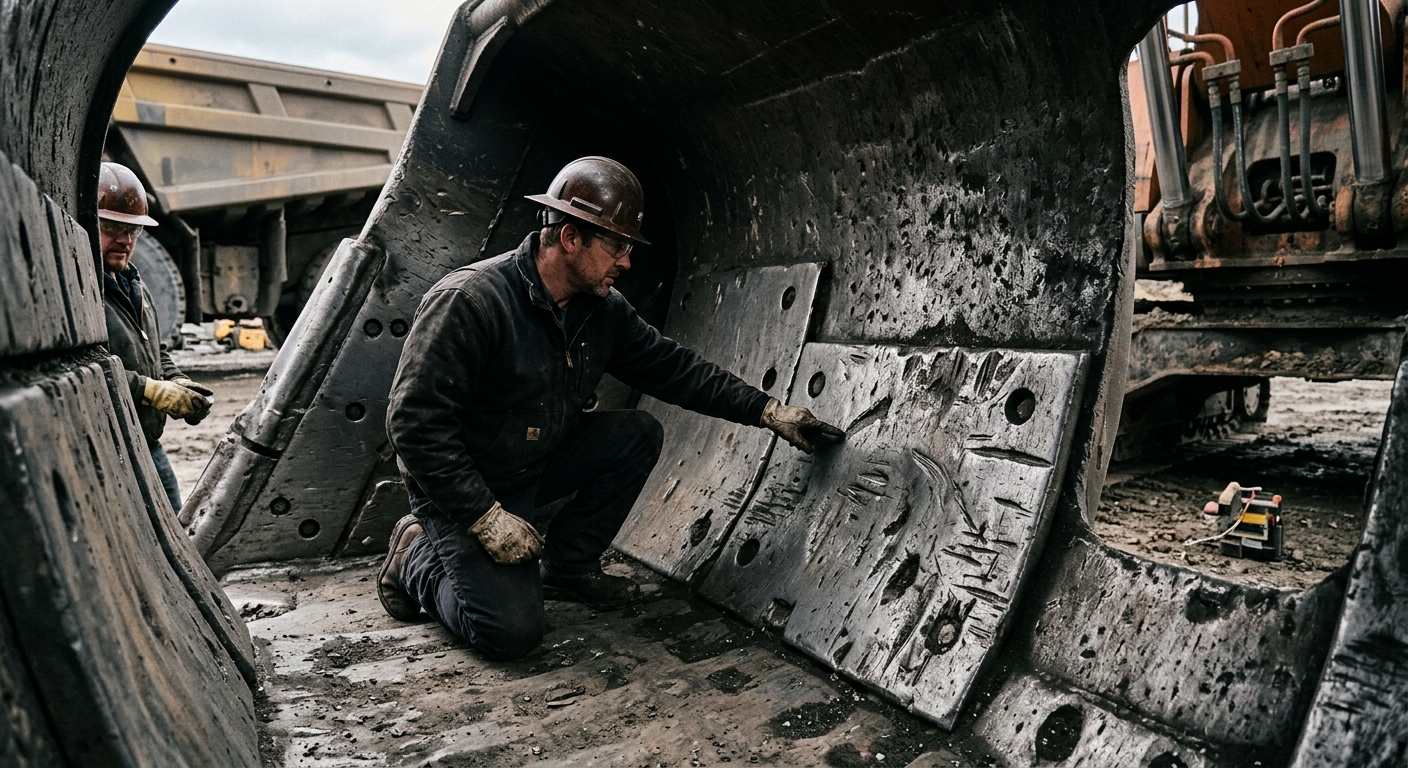
- Bucket floor and side liners
- Chute liners and hopper liners
- Dump body floor liners
- Cutting-edge adjacent wear strips
- Loader bucket heel shrouds and bottom plates
- Wear strips in concrete, aggregate, and material handling equipment
- Replaceable pads or guides in sliding contact zones
They are designed to be consumed gradually. That is normal. The mistake is expecting them to last until they become obvious emergencies.
Some materials wear mostly from sliding abrasion. Others get hammered by impact plus abrasion. Wet sticky material can create a false sense of security because it may cushion impact while still trapping grit and moisture. Sharp angular aggregate is especially brutal. Recycled material can be worse because it mixes abrasion with hidden metal, concrete chunks, and unpredictable impact loads.
Important: A wear plate that looks acceptable from ten feet away may already be too thin in the actual load path. Clean the surface, inspect the highest-contact zones, and measure instead of guessing.
Where to look for liner wear
The right inspection points depend on the machine, but the same pattern shows up again and again: the worst wear happens where material changes direction, impacts first, or drags repeatedly under load.
Pay extra attention to these areas:
- Leading impact zones where material first hits
- Floor-to-wall transitions where material packs and scrubs
- Corners that trap fines and moisture
- Areas around weld seams, plug welds, or bolt heads
- Discharge points where material accelerates during unloading
- Spots where a loose liner can flex against the structure underneath
If you only glance at the easiest visible section, you will miss the real problem. A liner can still look decent near the top while the bottom third is nearly gone.
What Good Liner Management Looks Like
Pros:
- Planned replacement before the base structure gets chewed up
- Less crack propagation into buckets, beds, or hoppers
- Better material flow and less hang-up during unloading
- Easier parts ordering and less emergency fabrication
Cons:
- Requires cleaning before inspection
- Requires measuring, not just eyeballing
- Needs a record of prior thickness or wear observations
What Reactive Liner Management Looks Like
Pros:
- Feels cheaper this month
- Avoids pulling the machine out of service right now
Cons:
- Surprise structural repairs
- More welding and fabrication labor
- Longer downtime waiting on steel and shop capacity
- Higher odds of recurring cracks after the repair
The biggest warning signs of trouble
Some liner failures are obvious. Many are not. These are the red flags worth taking seriously:
- Polished shiny spots that keep expanding. That often means the sacrificial surface is getting thin in the exact load path that matters most.
- Dishing, oil-canning, or flexing. If a liner starts moving more than it used to, attachment points or surrounding structure may already be weakening.
- Cracks at edges or weld toes. Cracks around wear parts mean the structure is sharing load it was not meant to absorb directly.
- Material sticking where it used to flow cleanly. Worn or distorted liners can change discharge behavior and leave crews beating on a body or bucket to empty it.
- Uneven wear from side loading or poor loading habits. One side thinning much faster than the other is a clue that operation, not just material type, is contributing.
- Loose bolts, missing retainers, or lifted edges. A liner that starts moving will usually accelerate its own failure.
Danger: Do not wait for a liner to wear completely through before acting. Once the backing structure starts disappearing, repair scope becomes harder to predict and much more expensive to control.
How to inspect thickness and attachment points
Good inspections are simple, but they are not casual.
Start with a clean surface. Packed mud, concrete residue, sticky fines, and rust scale hide real wear. Once the liner is clean, inspect visually and physically:
- Look for shiny thin zones, gouges, cracks, and edge lift
- Tap suspicious areas and listen for changes in sound
- Check bolt tightness and look for elongated holes or fretting
- Inspect welds for toe cracking, undercut, or separation
- Compare left and right side wear patterns
- Measure thickness in the highest-contact zones if you have original spec or baseline measurements
If you do not know the original thickness, start creating a baseline now. Even a simple log that says “bucket floor liner center: approximately X thickness remaining” is better than relying on memory six months from now.
Practical inspection routine
Weekly on high-abrasion machines:
- Clean the liner surface enough to expose wear pattern
- Photograph key wear zones
- Check for loose hardware, curl, or cracking
Monthly or every 250 hours:
- Measure the thinnest visible sections
- Check adjacent structure for beginning cracks
- Review operator complaints about poor cleanout or unusual noise
At major service or planned downtime:
- Compare current thickness to prior notes
- Decide whether patching, overlay, section replacement, or full liner replacement makes sense
- Order steel, hardware, or fabricated kits before failure becomes urgent
Thickness matters, but attachment condition matters too. A decent liner with failing welds can damage the machine almost as fast as a thin liner. Once a plate starts vibrating or shifting, it can hammer fasteners, distort surrounding metal, and create crack starters in the parent structure.
Repair vs replace decisions
Not every worn liner needs full replacement immediately, but a patch is not always the smart play either.
Use this rule of thumb: repair is acceptable when you are still protecting healthy parent structure and the wear pattern is localized. Replacement becomes the better move when large sections are thin, attachment points are compromised, or the base structure is already taking damage.
Tip: If you are about to spend shop hours building up thin liner sections in multiple places, stop and price a proper replacement. Fleets often throw labor at old steel because it feels cheaper, then end up paying twice.
Questions worth asking before you decide:
- Is wear localized or spread across most of the surface?
- Are cracks limited to the liner or moving into the structure behind it?
- Are bolts, welds, or supports still healthy?
- Is the machine entering peak season where downtime hurts more?
- Can the repair be done cleanly, or are you stacking fixes on top of previous patches?
If the liner has already been patched repeatedly, replacement is usually the more honest answer. Layering old fixes over old wear often creates uneven material flow, hard spots, and new stress risers.
Operator habits that accelerate wear
Material type matters, but operator behavior matters more than some fleets want to admit.
These habits speed wear dramatically:
- Slamming material into one side of a body or bucket repeatedly
- Dragging the bucket heel or floor across abrasive ground unnecessarily
- Using the wrong attachment for the material
- Letting sticky material build up until crews hammer on the structure to clear it
- Side-loading components that were designed for straight material flow
- Running with loose wear parts because “it can make it through this week”
Operator feedback is useful here. Good operators can usually tell when a machine starts carrying differently, emptying poorly, or sounding harsher under load. That is valuable information, not complaining.
Building a liner maintenance schedule
There is no single perfect interval because material abrasiveness, operator technique, moisture, and production volume all change wear rates. A quarry machine may need far more attention than a unit moving topsoil or mulch.
Still, every fleet should have a schedule framework.
Sample liner maintenance schedule
Daily or pre-shift
- Quick visual check for obvious cracks, lifted edges, or missing hardware
- Ask operators whether material flow changed or new noise showed up
Weekly
- Clean critical wear zones enough for inspection
- Photograph bucket floors, body floors, hopper transitions, or other known hot spots
- Check weld seams and corners for fresh cracking
Every 250 hours
- Measure thickness at the highest-wear points
- Compare left-right wear and front-rear wear
- Review whether a patch or planned replacement should be scheduled
Every 500 to 1,000 hours or seasonal shutdown
- Perform a deeper structural inspection behind sacrificial surfaces
- Repair cracked supports, backing plates, or mounting surfaces
- Replace liners that are near threshold before peak workload starts
The key is consistency. Even rough trending data is enough to spot whether one machine, one operator, or one material stream is burning through liners unusually fast.
Field example: the expensive cost of waiting
Case study
A contractor had a dump body liner that was visibly thin near the rear discharge area. Everyone knew it. The machine was still hauling, and the logic was simple: finish the busy stretch, then deal with it later.
Later showed up as a crack running into the body floor and support structure after the liner finally wore through. What should have been a planned liner job turned into cutting damaged parent metal, rebuilding support sections, fitting new steel, repainting, and eating extra downtime while the truck sat in the shop during active work.
The painful part was not the liner cost. It was the collateral damage and lost production caused by waiting too long.
That pattern repeats across buckets, hoppers, chutes, concrete equipment, and material bodies. Wear parts are cheap compared to structure. The trick is acting while that statement is still true.
Track wear parts with FieldFix
Wear parts get missed because they live in the gray area between operations, fabrication, and maintenance. FieldFix closes that gap.
With FieldFix, teams can:
- Log liner inspections with photos and thickness notes
- Track recurring wear areas by machine and attachment
- Flag planned replacement windows before parts become emergencies
- Compare wear life across operators, jobs, and material types
- Keep repair history attached to the machine instead of trapped in one person’s memory
Stop treating wear parts like surprises
If your fleet runs abrasive material, liners and wear plates deserve a real system. FieldFix helps you document inspections, spot repeat failures, and schedule replacements before steel loss turns into structural downtime.